![]()
Having a rainwater tank is a great way to save water and benefit the environment. But if you don’t keep it in good shape, it could end up costing you. Small leaks often go unnoticed, but they can cause big problems over time. Neglecting them might lead to flooding, slippery patches, and even mould.
Fortunately, minor rainwater tank leaks can be repaired with routine inspections and care before causing any real harm. This guide will walk you through the signs of a leak, safe methods for emptying a leaking tank, finding and fixing cracks, cleaning out sludge, and determining when replacement is needed. We’ll also provide tips to help prevent future leaks through proper maintenance.
By following these simple tips, you can prevent small issues from becoming big headaches. A bit of effort now will ensure your rainwater system runs smoothly for years to come. Stick around to find out how to keep your tank in top shape and avoid potential leaks and damage.
Detecting Rainwater Tank Leaks Early Prevents Bigger Issues
Catching leaks in their early stages is critical to avoid catastrophic tank failures, property damage, and safety hazards. But rainwater tank leaks can be tricky to spot at first. Subtle clues like wet patches or droplets around the tank’s base, pipe connections, or along the foundation can alert you to a potential problem. Also, look for moisture on nearby walls or floors.
![]()
Keep an eye out for dark patches, which indicate prolonged saturation. After rain, watch for unusual puddles or soaked ground. Leaks might not show straight away. If your water level drops faster than it should, that’s a clue too. Excessive algae, mould, or musty smells can also hint at leaks since they thrive on moisture.
Cracked, damaged, or uneven areas on the tank exterior may signal leaks from interior pressure. Rust around bolts, seams, and joints indicates water exposure over time. Popping, creaking, or dripping noises from the tank during water pressure changes can occur. Overflowing gutters leading to the tank is problematic since backups can stress the system. Another potential leak indicator is higher than normal water use bills if the tank feeds the household supply.
Make it a habit to periodically inspect your tank, pipes, foundation, and surrounding soil. Many leaks can be sealed with epoxy or other tank repair products when caught early. But if left unaddressed, small drips can progress to big cracks, pipe detachments, and tank failure. Don’t delay - schedule inspection and repairs at the first signs. Preventing major damage down the road is well worth the minimal time investment.
How To Safely Empty a Leaking Rainwater Tank
Before you start fixing your tank, it’s crucial to empty it safely. Here’s how you can do it:
- Turn off any pumps feeding the tank and shut supply valves. Disconnect electrical connections.
- Attach a submersible sump pump with a discharge hose to pump out water if needed. Wear rubber gloves and boots for safety.
- Open the tank outlet valve and empty the available water. Use buckets to catch the remaining water.
- Remove access panels once water is below their level. Prop open for ventilation.
- If water remains, use a siphon pump or wet/dry shop vacuum to drain gradually. Don’t empty too quickly.
- Direct drained water through a hose to landscaped areas or slowly into a storm drain if permitted in your region.
- Consider hiring a professional if you cannot access drained water or have hazardous mud. Professionals have vacuum equipment and confined space training.
- Remove the remaining muck by hand with proper protective gear. Rinse the interior with a low-pressure hose.
- Inspect interior wet surfaces for leak sources. Mark them with painter’s tape for repairs.
- Clean and disinfect the tank before sealing repairs. Allow to dry completely.
With precautions for electrical equipment, slick surfaces, confined space risks, and contaminants, you can safely empty a leaking rainwater tank on your own in moderate leak cases. But don’t hesitate to call a professional if the job seems too extensive.
![]()
Cleaning Out Sludge Buildup in Your Tank
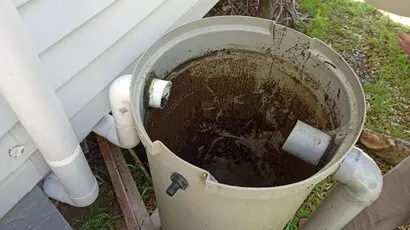
Over time, thick sludge can accumulate at the bottom of rainwater tanks. This muck harms water quality and can clog pumps and pipes. Follow these tips to remove sludge:
- Drain the tank fully as described above before cleaning. Allow any sediment to settle.
- Scoop out sludge manually, wearing waterproof gloves, boots, and goggles. Remove chunks and dispose properly.
- Pressure wash the interior with care not to damage surfaces. Start at the top, working down.
- Use a wet/dry shop vac to remove stirred-up sludge. Take care on slippery surfaces.
- Scrub the remaining debris using brushes on long poles. Avoid electrical while inside.
- Rinse away loosened sediment towards the outlet valve. Fully drain again.
- Consider adding a first flush diverter kit to prevent future buildup during tank refill.
- Install an inline filter system on the pump line to catch ongoing accumulation.
- Practice preventive cleaning every 3-5 years. Do a full flush after extreme weather.
- Hire professionals with confined space expertise for extensive sludge removal jobs.
Proper cleaning improves the quality of the harvested rainwater in the household and maintains optimal tank function. However, safety precautions should be taken against hazardous gasses and slippery conditions when doing interior work.
Replacing Very Old or Badly Damaged Rainwater Tanks
Full replacement may be your best option if your rainwater tank is outdated or structural repairs are insufficient. Signs indicating replacement include extensive corrosion, cracks wider than 1/8 inch, damage from fallen trees or debris impact, and past tank failures after repair attempts. Upgrading to a larger tank during replacement projects can also be considered.
When seeking a new tank, look for durable materials like polyethylene, fibreglass, or concrete and choose the appropriate size based on your property’s water usage needs. Be sure to select a reputable manufacturer offering at least a 10-year warranty. Tank style, placement, and aesthetics are also important factors if visibility is a concern.
![]()
Professional installation is strongly advised for tank replacement. A qualified contractor can determine the ofptimal tank specifications and location, safely remove your old tank, and properly install the new system. Permits may be required for the work. The contractor should seamlessly integrate any existing rainwater catchment and distribution components like gutters and pumps into the new tank.
This major investment helps ensure you’ll have an effective rainwater harvesting system for decades. And it’s still less expensive than ongoing repairs and damages from leaks and failures.
Prevent Future Leaks Through Proper Rainwater Tank Maintenance
The best way to avoid the headaches and hazards of a leaking rainwater tank is prevention through proper maintenance. Routine inspections of your tank are crucial - at least annually and after extreme weather events. Look for any developing cracks or other concerning signs during inspections. Keep gutters and debris screens clean to prevent overfilling and overflow issues after heavy rains. Consider installing overflow valves as a further preventative measure.
Perform occasional washouts to remove accumulated sludge, leaves, grit and other sediment. This keeps water quality high and avoids pump clogs. Repair minor cracks, leaks, and damages immediately before they can worsen. Check and replace old pipes that show corrosion, cracks or loose fittings. Ensure access points and ventilation are clear and ladders are secured inside the tank. Replace worn or damaged parts like pumps, valves, and filters as recommended.
Consider setting up a maintenance plan with a professional rainwater company to manage big cleanings, inspections, and any repairs. Doing this can really lighten the load for homeowners.
With proper care and attention, you can help your rainwater tank last leak-free for decades. Don’t wait until small problems become huge headaches threatening your home’s foundation and structures. Your efforts to care for your tank will pay off with reliable, efficient rainwater capture for years.
For professional installations, repairs, replacements or maintenance assistance, contact the WP Plumbing team today to schedule a service. Our water tank leak repair experts are here to help your system operate sustainably at peak conditions.


